Don’t know how to format pendrive? Here provides you several solutions. You can use the built-in tools in Windows or third party pen drive format software also can be a good choice. Next, you can see the examples of formatting pendrive to FAT32 in Windows.
Method 1. Format pen drive with Disk Management
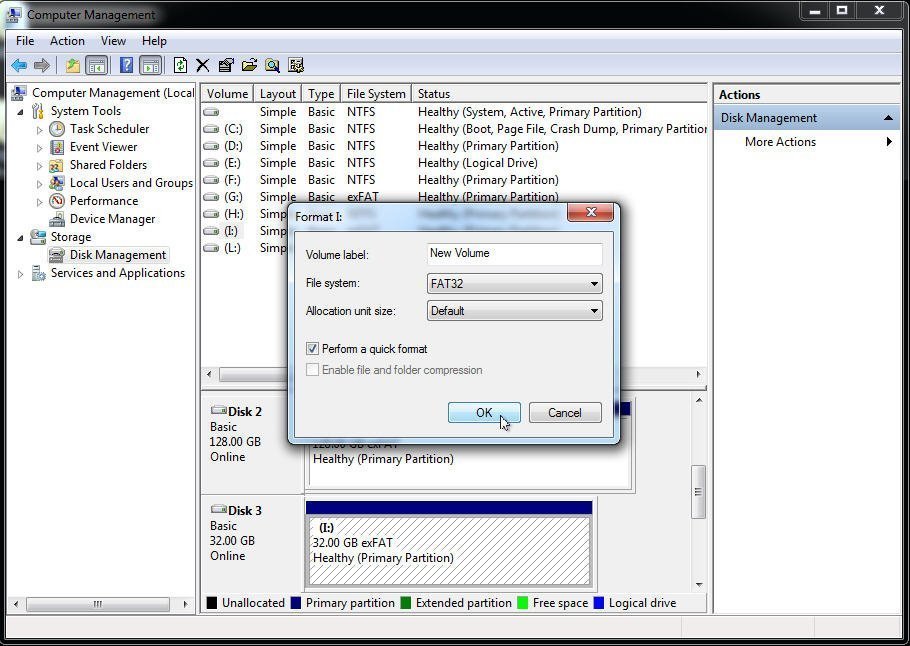
1. Right click on “Computer” and select “Manage” > “Disk Management” to open Disk Management. You can also open it by type “diskmgmt.msc” in the Run box.
2. Right click the pendrive and select “Format”.
3. Then, select FAT32 (or other file system you need) and click “OK” to start format.
Tips:If the drive is shown as unallocated space, please right click it and select “New Simple Volume”. Then, you can follow the New Simple Volume Wizard to create new partition for your pendrive.
Method 2. Format pen drive with CMD
1. Open the command prompt by typing “CMD” at the search box, right click the program and select Run as Administrator.
2. At the command prompt window, input the following commands and hit “Enter” after each command.
diskpart
list volume
select volume n (here “n” is the number of the drive you want to format.)
format fs=fat32 quick (here if you need to format your storage drive to other file system like exFAT, replace the command with “format fs=exfat quick”.)
Try other
- Open the Command Prompt. You can start the Command Prompt from the Start menu, or by pressing the Windows key + R and typing cmd.
- Type .diskpart and press Enter. You may be prompted for administrator access. The prompt will change to DISKPART>.
- Type .list disk and press Enter. This will list all of your connected disks.
- Type .select disk # and press Enter. Replace # with the number associated with your USB drive.
- ype .clean and press Enter. This will check the disk for errors.
- Type .create partition primary and press Enter. This will create a new partition on the disk.
- Type .active and press Enter. this will make the newly-created partition the active partition on the USB drive.
- Type .format fs=fat32 and press Enter. This will format the new partition using the FAT32 file system, which is compatible with most devices and computers.
- The format process will likely take a while to finish.
- Type .exit and press Enter. This will close the DISKPART utility.[2]
- If your USB drive will still not show up in Windows after using the DISKPART utility, or you receive errors when trying to format, your USB drive is most likely damaged and no longer functional.
Method 3. Format pen drive with pen drive format software
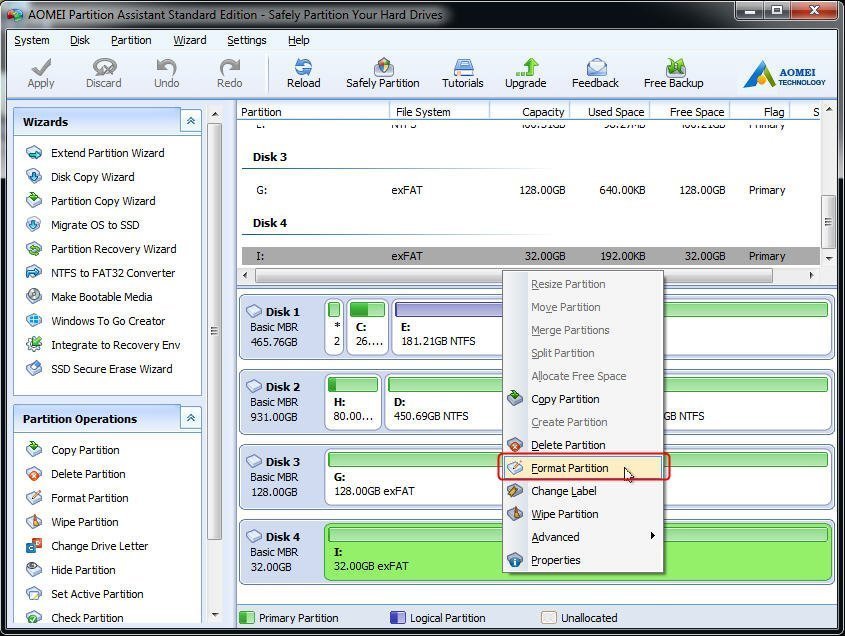
Step 1. Download, install and run AOMEI Partition Assistant. Right click the partition of your pendrive to select “Format Partition”.
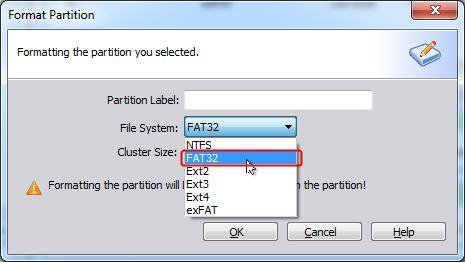
Step 2. In the pop-up window, choose the FAT32 file system. Here you can specify “Cluster Size” under file system if you need to. And click “OK” to continue.
Step 3.After that, it will go back to the main interface. Preview the changes and click “Apply” “Proceed” to complete the operation.
Method 3. format a USB flash drive using PowerShell
Alternatively, you can also use Command Prompt to format a USB flash drive to delete the file system table and data. Or you can also use the tool to clean the drive and start fresh with a new partition and file system table.
Formatting flash drive
To perform a quick or full format of a USB flash drive using Command Prompt, use these steps:
Open Start.Search for Command Prompt, right-click the top result, and select the Run as administrator option.
Type the following command to perform a quick format of the USB flash drive and press Enter (twice):
- format VOLUME: /v:FLASHDRIVE-LABEL /fs:FILE-SYSTEM /q
- In the command, make sure to replace the "VOLUME" with the correct drive letter of the storage, "FLASHDRIVE-LABEL" with the name you want the drive to appear in File Explorer, "FILE-SYSTEM" with one of the available file systems, including "FAT32," "exFAT," or "NTFS" (recommended).
- This example is a quick format of the E drive: format E: /v:workFlash /fs:NTFS /q
- (Optional) Type the following command to perform a full format of the USB flash drive and press Enter (twice):
This example performs a full format of the E drive:
format E: /v:"workFlash" /fs:NTFS

Cleaning and formatting flash driveTo clean and format a USB thumb drive with Command Prompt, use these steps:
- Open Start.
- Search for Command Prompt, right-click the top result, and select the Run as administrator option.
- Type the following command to launch the diskpart tool and press Enter:
- diskpart
- Type the following command to view a list of the available drives and press Enter:
- list disk
- Type the following command to select the flash drive you want to delete and press Enter:
- select disk DISK-NUMBER
- In the command, make sure to replace "DISK-NUMBER" for the correct number that represents the drive you're trying to format.
- This example selects the flash drive listed as disk number 1:
- select disk 1
- Type the following command to delete all the partitions and press Enter:
- clean
- Type the following command to create a primary partition and press Enter:
- create partition primary
- Type the following command to perform a quick format and press Enter:
- format fs=FILE-SYSTEM label=DRIVE-NAME quick
- In the command, make sure to replace "NTFS" for your preferred file system, "workFlash" for the name you want to give the device, and if you don't specify the "quick" option, then a full format will be performed.
- This example quickly formats the removable storage using the NTFS file system:
- format fs=NTFS label=workFlash quick

- Type the following command to assign a drive letter and press Enter:
- assign
- Quick note: You can append "letter=e" in the command to assign (in this case) "E" as the drive letter. Otherwise, the system will assign a letter automatically.
- Type the following command to terminate diskpart and press Enter:
- exit
- Once you complete these steps, diskpart will remove any information on the USB flash drive. It'll create a new partition and configure a compatible file system to store files from your Windows 10, macOS, or Linux machine (depending on your settings).


